| | 
Having gone through my first plenum pull, I can hopefully make some quasi-intelligent suggestions on what to replace while the plenum is off. This is not a "how to" but sort of a "what to." To veterans, this stuff may be old hat and obvious, but I could’ve used a write-up like this in one place before I started the job. My 1992 300ZX Twin Turbo had 91,000 miles on it at the time. SpdDemon (Harry) did the lion's share of the work. He was basically three times faster than me, with better quality work. Major helping and strong hands were also lent from Spencer and YugoBernie (Bernie). Garage was generously provided by Bruce_Zee (Jon), who remained unaffected when the job spilled over to the wee hours of the morning. Either find someone who knows what they are doing or plan on being in absolutely no hurry to get it done. I took advantage of the kind nature of my TwinTurbo.net friends and contacts.
Here’s a photo of the engine with the plenum off. I marked the coil pack connectors with yellow dots, and the fuel injector connectors with the red dots, for no particular reason other than you can now see the whole main harness in the engine bay, kinda. The pic got shrunked a bit.
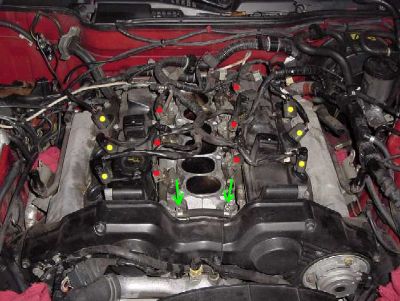
Basically, the whole job started because of a fuel leak. That Bastard Piece of Hose from Hell, which connects the front of the fuel rails. The two clamps on this hose are shown by the green arrows. The short, black hose between the clamps can be clearly seen just above the center of the timing belt cover. Three inches of fuel injection line nearly inaccessible to replacement without removing the whole upper plenum. Dontcha' just love Z engineering at times?
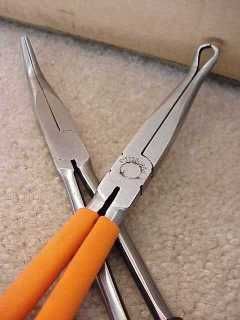 We came close at least three times to making a run to the hardware or auto parts store, and that was with four guys who each essentially had a complete set of tools. We did work-arounds for each problem but I consider that lucky. The most useful tools we used that I didn't already own (I do now) were eleven-inch long, curved, needle nose pliers, and long, hose pliers, shown resting on top - notice the tips. They were indispensable for removing clamps and hoses in hard to get at places. We came close at least three times to making a run to the hardware or auto parts store, and that was with four guys who each essentially had a complete set of tools. We did work-arounds for each problem but I consider that lucky. The most useful tools we used that I didn't already own (I do now) were eleven-inch long, curved, needle nose pliers, and long, hose pliers, shown resting on top - notice the tips. They were indispensable for removing clamps and hoses in hard to get at places.
You will need some gaskets. The most important one is the large plenum gasket. For about seven bucks more, you can get a couple of EGR plenum gaskets and an AAC/IAC valve gasket.
I already had a set of new Nismo 555cc injectors sitting on the shelf. The car was still on its original set, and ran perfectly. After thinking about it for around two seconds, the choice was clear. Replace the injectors. That significantly complicated the job, but not as complicated as putting the plenum back on and finding out a month later that my injectors were failing. If you don't have the dough-re-mi for the injectors, then you can always Dremel them out one at a time in the future with the plenum on, but often when one starts to go the others follow. I was satisfied with the 91K I had gotten out of my injectors and decided to replace them while the plenum was pulled.
If you upgrade your injectors, you must upgrade you ECU as well. If your ECU is already socketed from a previous upgrade, then you just need the EPROM chip. Each time you upgrade your chip, you pay money unless your name is Jim Wolf or Ash. Figure out whether or not you want to upgrade to the dual POP intake at the same time so that you can get the EPROM reprogrammed all at once. I didn't need a dual POP intake at my level of mods.
Most folks know you need to buy two, different sized rubber O-rings for each injector, upper and lower. There is a third rubber sleeve that is seated in the injector socket, not the rail. I would replace these too since each one of them showed signs of wear on my car.
Replace the Phillips screws that attach the fuel injectors to the rail with stainless steel hollow set screws. The old ones are a bitch to get off and you will usually strip one or two. We needed Vise Grips on a few of them. Nissan sells a replacement set of upgraded screws, as does wcoffey from TwinTurbo.net. His customer service was excellent.
Once the plenum is off, you may want to consider the throttle body (TB) bypass. I was amazed at all the hardware and hoses underneath the plenum that were eliminated as part of this mod, shown marked with red dots in this photo.
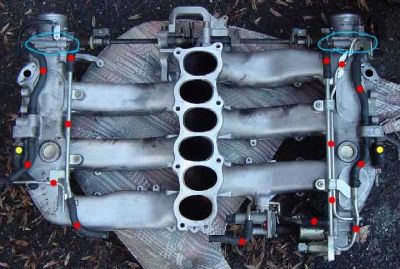 These hoses should all be replaced if you don’t do the bypass. The blue circles at the front of the plenum are around the short section of metal tubing attached under the throttle bodies. This is the part that heats the TB intakes. They warm the butterfly hinge points of the throttle body valves by direct heat conduction through the metal. Do not let anyone tell you it has something to do with warming the air entering the throttle body. These hoses should all be replaced if you don’t do the bypass. The blue circles at the front of the plenum are around the short section of metal tubing attached under the throttle bodies. This is the part that heats the TB intakes. They warm the butterfly hinge points of the throttle body valves by direct heat conduction through the metal. Do not let anyone tell you it has something to do with warming the air entering the throttle body.
The whole system is an example of Nissan over-engineering, IMHO. I've only heard of one person whose throttle bodies stuck after doing the bypass, and I have searched on TT.net many times for such an incident. That was during a prolonged highway trip with the cruise control engaged in sub-freezing weather. The throttle stuck briefly when the cruise control was disengaged, and was instantly relieved by a tap on the gas pedal. I have no problems to report with the bypass, which I feel was mainly installed by Nissan as a product liability precaution, and not because of any compelling performance issue.
In the "You're-Crazy-if-You-Don't-Replace-Them" department would be the PCV valves. Buy the OEM, five-hose kit. There is a later version of three of the hoses that contain metal restrictors inside to quiet down any noise from the PCV valves. The old and replacement part numbers are shown below, as based on Nissan Technical Service Bulletin (TSB) NTB91-040 PCV valve noise. I believe you will automatically get the new parts as long as you order OEM, but it's worth checking out to make sure.
| part name | new part | old part | | valve assembly control | 11810-40P00 | 11810-30P00 | | hose blow by | 11823-30P01 | 11826-30P01 | | hose blow by | 11823-30P11 | 11826-30P11 |
Replace both PCV's valves, one on each side underneath the plenum, shown under the yellow dots. Theoretically it is possible to change the valves with the plenum in, but it is infinitely easier with the plenum off. As with most things Z, there is an easy side, and a hard side. You’ll know which is which by the time you are done.
Once you've dug that deep into your engine, you've pulled or disconnected most of your fuel and vacuum lines. Replace them. Use high quality fuel injector line and silicone vacuum lines. Nissan OEM is great, but expensive. For the vacuum lines I recommend either Hose Techniques or Baker Industries. You can buy car specific kits, or make it simpler and buy 20 feet each of four millimeter and six millimeter hose. Do one vacuum line at a time so you don’t get your connections confused.
For the fuel injection line, I started with seven feet of the expensive, eight-millimeter Nissan hose, which sells for $1.14 per INCH, or about one hundred bucks for the seven feet. As long as you are sure to buy high-pressure, fuel inection line, then you can use 5/16" from the neighborhood auto parts store, which will be a lot cheaper. Just be sure to not use plain fuel hoses designed for carburetored engines, which will not hold up to the high pressure of fuel injection, and therefore fail and possibly make car go boom.
By the time we were done, there were only a few inches of the fuel injection line left, but I had used the fuel injection line to also do the throttle body bypass. This was overkill and an expensive way to do the TB bypass, but I already had the line on hand so we used it. Instead, for the TB bypass, you can use much less expensive generic heater hose or regular fuel line since the regular TB hoses just carry hot water and are not under the same high pressure as the fuel injection system.
I used this opportunity to disconnect, bypass and remove the PRVR solenoid, although this can be done at anytime without having to pull the plenum.

The orange hose shows the bypass at the plenum. Those two connections were originally running down to the PRVR solenoid, which is inside the engine bay, against the driver's side wheel well. The bracket that holds the PRVR solenoid is attached to the bracket holding the fuel filter, which should help you locate the solenoid easily. The three solenoids to the PRVR, EGR and AIV's are identical parts.
 The solenoid and its bracket look like this. You can unplug the electrical connection at the solenoid off of the main harness and leave it hanging, and this will not cause the ECU to throw any error codes. Tuck the vacuum hoses out of the way, or cut them where the dive into the driver's side fender well. In order to remove them entirely, you will have to get into the driver's side wheel well from the tire side. Once inside the wheel well, you can see where the hoses are attached to the PRVR vacuum canister. This canister is black, the same shape of a D cell battery, but about twice as large. Behind and below the PRVR canister there is a white, flat, clutch assist vacuum tank that you should leave alone, unless you want to replace these hoses, too, while you're in there. The clutch assist hoses are pre-formed and special order. The solenoid and its bracket look like this. You can unplug the electrical connection at the solenoid off of the main harness and leave it hanging, and this will not cause the ECU to throw any error codes. Tuck the vacuum hoses out of the way, or cut them where the dive into the driver's side fender well. In order to remove them entirely, you will have to get into the driver's side wheel well from the tire side. Once inside the wheel well, you can see where the hoses are attached to the PRVR vacuum canister. This canister is black, the same shape of a D cell battery, but about twice as large. Behind and below the PRVR canister there is a white, flat, clutch assist vacuum tank that you should leave alone, unless you want to replace these hoses, too, while you're in there. The clutch assist hoses are pre-formed and special order.
I also left the connection to the AIV solenoid on the passenger side hanging, since it was already deactivated by my JWT ECU. I removed all the vacuum hoses to the AIV and PRVR system and this tidied up my engine bay quite a bit. I left the AIV hardware in the wheel wells in place in case of the unlikely event that I ever have to do a reverse install. I guess you can tell I’m from the school of thought to simplify the Z engine bay whenever possible. I would've done an EGR bypass, except that basically requires an engine pull and not just a plenum pull.
Two last parts you can replace if you want are the fuel damper and fuel pressure regulator on top of the plenum. These parts are NOT dependent on plenum removal if you want to wait, but are still under the category of good preventive maintenance.
When you get everything put back together don't immediately panic if your car runs like sh*t at first for a few minutes. Mine did. I don't know if it was the fuel pressure building back up, or the ECU relearning the set up, but after several minutes, the car ran fine. Then I was in safety boost until I found the boost solenoid on the passenger side was not connected. Snapped that back together and the car ran perfect. And no fuel leaks.
Hope this helps!
| |