I took out my digital instrument cluster to fix my odometer so my Z would pass inspection. Even though the digi-dash has a bad reputation for not working, EVERYTHING on my digi-dash worked perfectly EXCEPT for the analog odometer. Go figure.
Be sure to read through this ENTIRE article before starting the removal. Otherwise, you will repeat my same error. I did not figure out how to drop the steering wheel until AFTER the cluster was out. The job was A LOT easier with the steering wheel dropped, but it was too hard for me to identify the proper bolts until I had the instrument cluster out.
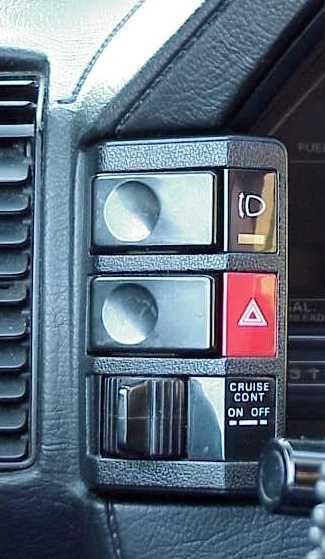
The two main benefits of this article are identifying the bolts that drop the steering wheel, and the nuts that fasten the side pods. Everything else is pretty easy to figure out if you're mechanically inclined, which I am not, so I spelled out the rest in nauseating detail, lolam.
I had to remove the driver seat in order to fit my fat ass under the dash. Use a 14mm socket. Move the seat all the way forward and then all the way back to access the three bolts and one nut that secure the seat to the floor. Disconnect the power wire to the seat underneath before lifting the seat out of the car. Remove the T-top and move the back of the seat forward to make clearing the seat out of the car easier. Watch your back. The driver seat was pretty heavy.
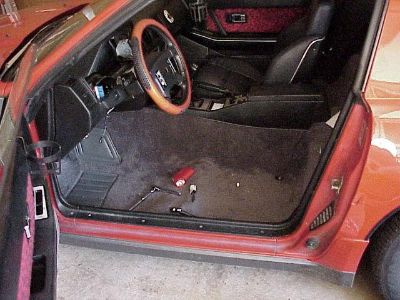 Unless you weigh less than 150 pounds, do yourself a favor and take five minutes to remove the driver seat for extra room to work. Unless you weigh less than 150 pounds, do yourself a favor and take five minutes to remove the driver seat for extra room to work.
Plus, it's a great opportunity to clean the carpet and pick up loose change.
Once the seat is out, lay it on its side and tighten everything you can can see.
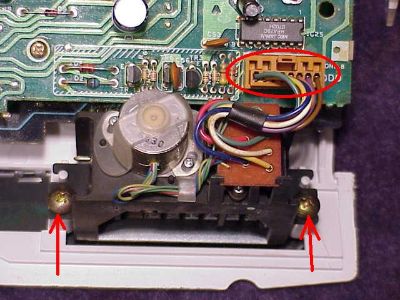
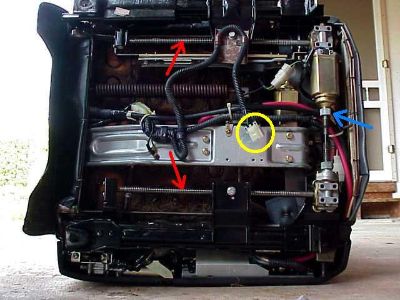 Use lithium grease on the drive screws (red arrows). The collar screw on the drive motor was dangling loose, shown by the blue arrow. Use lithium grease on the drive screws (red arrows). The collar screw on the drive motor was dangling loose, shown by the blue arrow.
The yellow circle is the electrical connector that needs to be unhooked before lifting the seat out of the car.
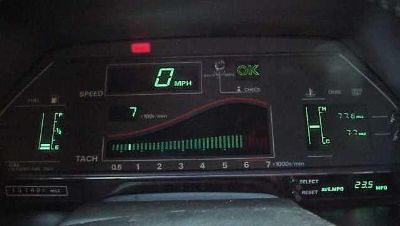 Digi-dash lit and in place. Notice the in-spec, 700 RPM idle :c) The odometer in the LL corner won't spin, so she's gotta come out. Digi-dash lit and in place. Notice the in-spec, 700 RPM idle :c) The odometer in the LL corner won't spin, so she's gotta come out.
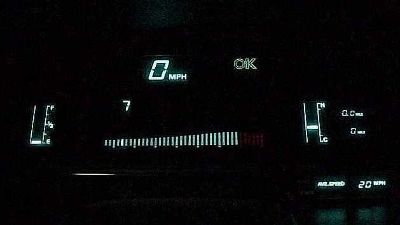 The digi-dash option was over $1500 extra when new, but most current Z collectors would prefer to steer away from it. When it works, it's definitely cool. The digi-dash option was over $1500 extra when new, but most current Z collectors would prefer to steer away from it. When it works, it's definitely cool.
 L side pod. The instrument lights behind this sucker were burnt out. Bulb replacement is shown below. Pods on both sides of the dash have to be removed before the digital cluster can come out. L side pod. The instrument lights behind this sucker were burnt out. Bulb replacement is shown below. Pods on both sides of the dash have to be removed before the digital cluster can come out.
First, remove the trim panel under the dash and above the knees, held in place by four screws.
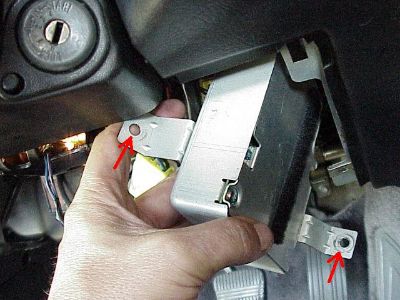
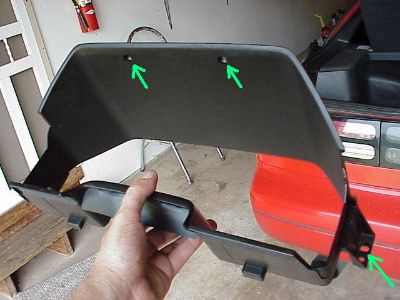
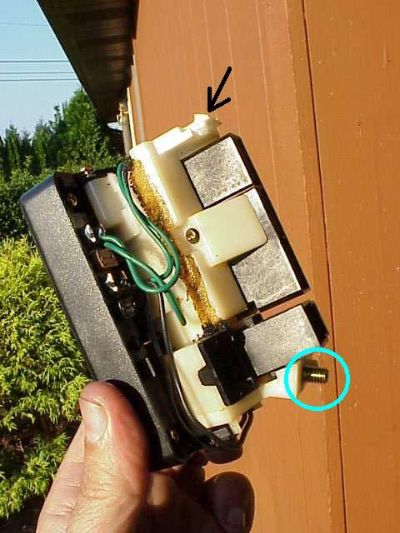 The control pods are each held in place by a prawl on top shown by the black arrow, and a 10mm flange nut that goes on the stud circled in blue. The factory service manual did not show the flange nuts, and this stumped me at first. I couldn't figure it out on my own but the nice folks at www.z31.com were helpful in getting me over this hump. The control pods are each held in place by a prawl on top shown by the black arrow, and a 10mm flange nut that goes on the stud circled in blue. The factory service manual did not show the flange nuts, and this stumped me at first. I couldn't figure it out on my own but the nice folks at www.z31.com were helpful in getting me over this hump.
 These are the two "hidden" ten millimeter flange bolts that fasten the control pods, up under the dash. Once you find and remove these, the rest of the instrument cluster removal is fairly obvious. These are the two "hidden" ten millimeter flange bolts that fasten the control pods, up under the dash. Once you find and remove these, the rest of the instrument cluster removal is fairly obvious.
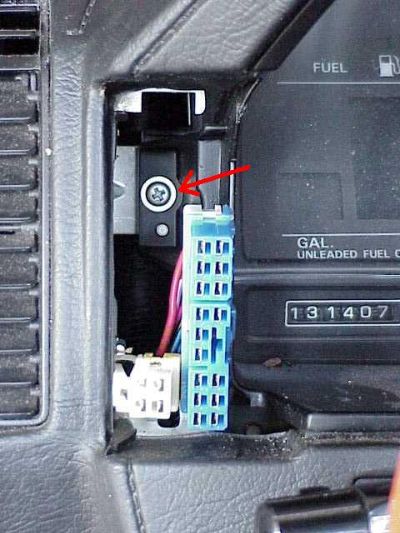
 This is the 10mm flange bolt that holds the left, driver side pod onto the dash. The front of the car is toward the top of the picture. I am on my back, looking straight up under the dash. This is the 10mm flange bolt that holds the left, driver side pod onto the dash. The front of the car is toward the top of the picture. I am on my back, looking straight up under the dash.
To get to the ten millimeter flange nut holding the right, passenger pod, a few pieces have to be removed, and then it can be reached with a long extension.
 This vent ducting is easily removed. Unscrew at the circle, and disconnect the connector at the arrow and the piece falls out. This vent ducting is easily removed. Unscrew at the circle, and disconnect the connector at the arrow and the piece falls out.
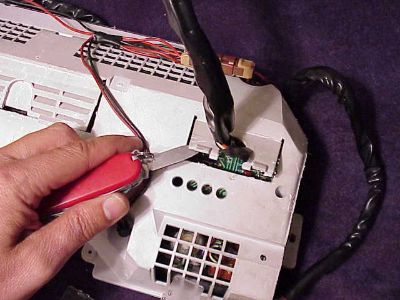
 The power supply to the dash is attached by a bolt and a nut at the two arrows. Of course, there is an electrical connector at the back. Ignore the velcro strip on the bottom of my unit :c) The power supply to the dash is attached by a bolt and a nut at the two arrows. Of course, there is an electrical connector at the back. Ignore the velcro strip on the bottom of my unit :c)
Once the vent ducting and dash power supply are removed, the bolt holding the right pod can be seen and unscrewed with a long socket extension. I couldn't get a decent pic because the bolt was buried so deep in the shadows.
 Once both pods are out, remove these screws behind each pod. Once both pods are out, remove these screws behind each pod.
 Then remove these two screws and the cowling can be gently worked free. Then remove these two screws and the cowling can be gently worked free.
 Cowling out. The trick for me was to turn the steering wheel and move the cowling in the same direction as the wheel, once the cowling was clear from behind. Cowling out. The trick for me was to turn the steering wheel and move the cowling in the same direction as the wheel, once the cowling was clear from behind.
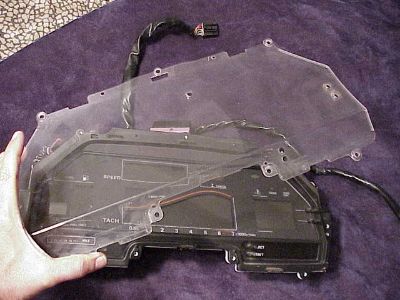
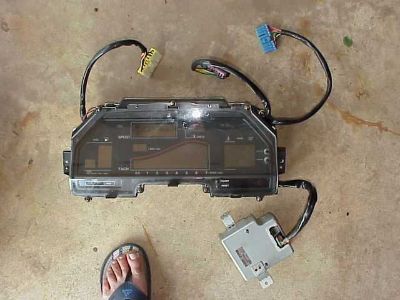 Dash and power supply in vitro. I reconnected them for the photo, but they come out separately. The three connectors up top are color coded so reconnecting them to the dash is easy. Dash and power supply in vitro. I reconnected them for the photo, but they come out separately. The three connectors up top are color coded so reconnecting them to the dash is easy.
Once removed, I took my broken odometer to Powls Speedometer Service. They told me they would need the car to fix it, but I had driven my z32. Then, unbelievably, they produced a junk digital dash from an '87 z31 Turbo they had lying around.
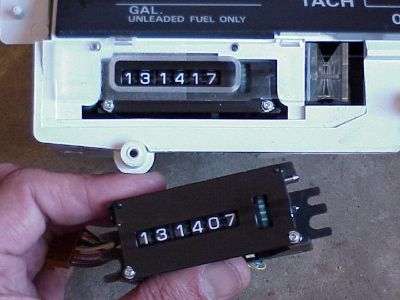 Powls spun the odometer in the junk dash to just a little over what my broken odometer read. Leave the two small screws on the front face of the odometer in place, you don't ever need to touch them. Powls spun the odometer in the junk dash to just a little over what my broken odometer read. Leave the two small screws on the front face of the odometer in place, you don't ever need to touch them.
I took the spare dash home and swapped the odometers.
I'm showing the reassembly of the cluster instead of the disassembly, because I generally find putting things back together much harder than taking them apart. Start at the last pic and read backwards if you need help in the disassembly, lol.
 There are two screws and an electrical connector holding the odometer in place. Unplug at the red circle. Even though it is an analog gauge, there is not any mechanical connection to the odometer. There are two screws and an electrical connector holding the odometer in place. Unplug at the red circle. Even though it is an analog gauge, there is not any mechanical connection to the odometer.
Even though it is not necessary to directly handle the circuit board, static electricity precautions should be maintained. How many volts are there in a typical static charge? The smallest static charge is at least 500 volts. Your body can easily store static charges in the tens of thousands of volts. Yeah, that can fry a circuit board.
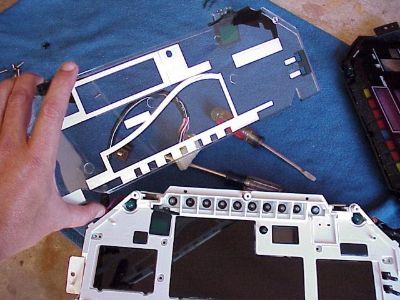
 Pry this window open to allow the harness cable to move freely. Pry this window open to allow the harness cable to move freely.
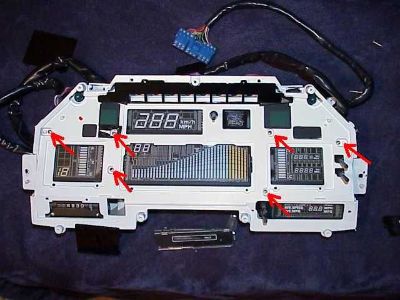 There are six small screws holding that front and back of the cluster together. I had to peel back some black tape to find a couple of them. There are six small screws holding that front and back of the cluster together. I had to peel back some black tape to find a couple of them.
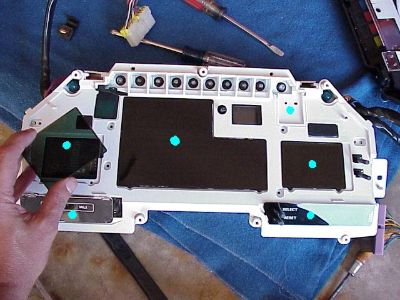
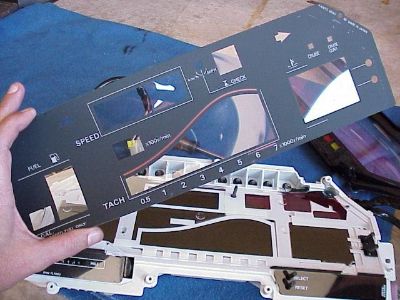
 Lay the dark green plastic lenses in place. Lay the dark green plastic lenses in place.
 Handle every piece by its edges. Handle every piece by its edges.
 Once you touch the inside surface of one of these pieces, you will never get it as clean as it once was. This job really deserves a clean room. Once you touch the inside surface of one of these pieces, you will never get it as clean as it once was. This job really deserves a clean room.
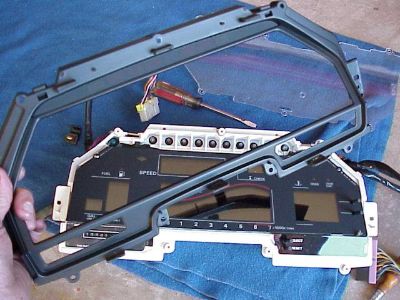
 Make sure these rubber stops are seated in their grooves. I used a dab of silicone to hold them in place. Make sure these rubber stops are seated in their grooves. I used a dab of silicone to hold them in place.
 Don't touch the inside of any lens or cover. If you must clean them, use a lint free cloth. Paper towels will scratch the plastic. You will never get a virgin piece as clean once you touch the surface. Don't touch the inside of any lens or cover. If you must clean them, use a lint free cloth. Paper towels will scratch the plastic. You will never get a virgin piece as clean once you touch the surface.
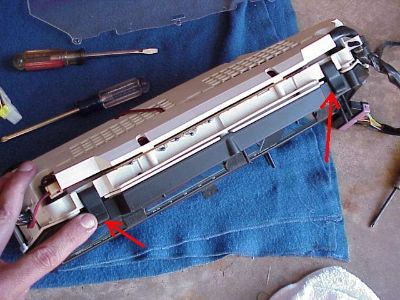
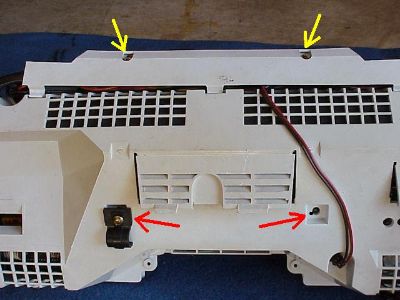 The yellow srews just hold a cover in place. I thought the red screws were optional, but they do more than hold the harness clip like the one shown on the left. The yellow srews just hold a cover in place. I thought the red screws were optional, but they do more than hold the harness clip like the one shown on the left.
The screws at the red arrows also anchor the circuit board on the inside.
 I removed the cluster without dropping the steering wheel column, but it was very tricky and I was lucky that I did not break or scratch the surface. I removed the cluster without dropping the steering wheel column, but it was very tricky and I was lucky that I did not break or scratch the surface.
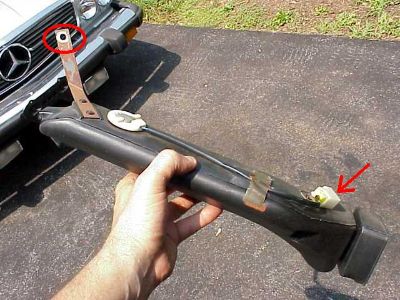
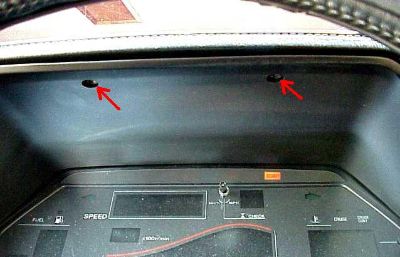
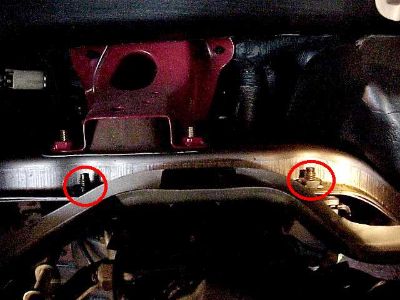
Once the dash was out, I was able to easily identify these two nuts. Access the bolts from underneath.
Removing these two bolts with a 12mm socket and extension made the reinstallation A LOT easier. Find them and take them out BEFORE removing the cluster and there won't be a struggle squeezing the cluster between the dash and the steering wheel.
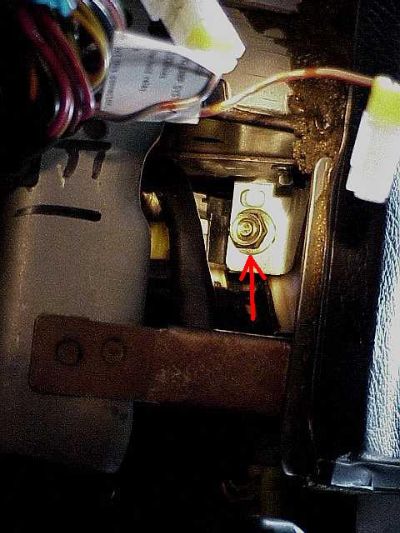
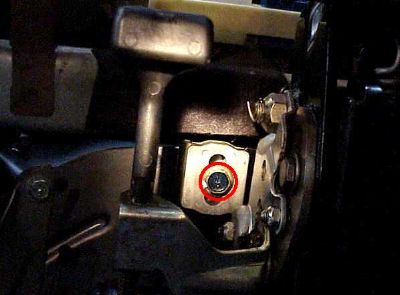 Here is one of two 12 mm bolts that drop the steering wheel and make removing and installing the cluster A LOT easier. This bolt is on the left side of the steering column. Here is one of two 12 mm bolts that drop the steering wheel and make removing and installing the cluster A LOT easier. This bolt is on the left side of the steering column.
That's the hood release handle next to the bolt.
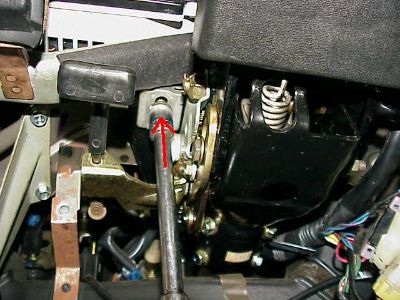 Removing above bolt. The hood release handle can be seen in both pics. Removing above bolt. The hood release handle can be seen in both pics.
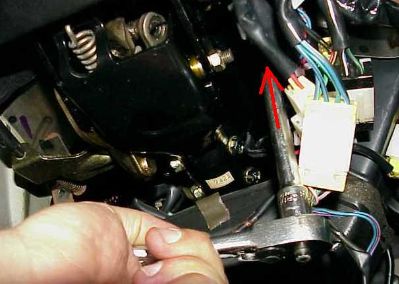 The second bolt on the right side of the steering column is hard to see, but easy to reach with an extension. The second bolt on the right side of the steering column is hard to see, but easy to reach with an extension.
The steering wheel will then drop about four inches, or a mile in terms of getting the cluster in and out.
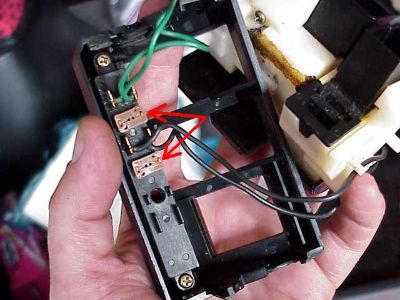 Before I put the pods back in, I replaced the bulbs on the L side that were burnt out. The red arrows point to the pod bulbs. A few screws held the cover in place. Before I put the pods back in, I replaced the bulbs on the L side that were burnt out. The red arrows point to the pod bulbs. A few screws held the cover in place.
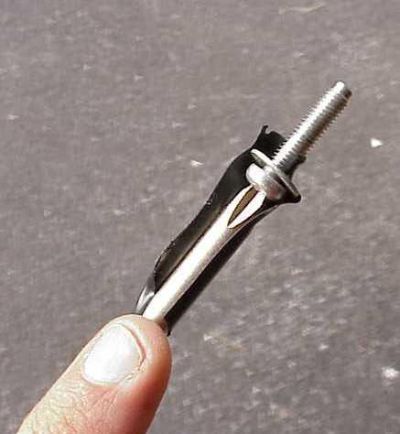
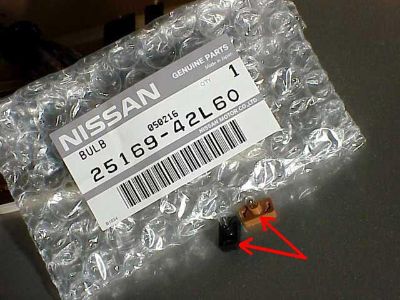 That's the part number for the black bulb. That's the part number for the black bulb.
 Don't be proud. This little trick saves a lot of dropped and lost screws. Use just enough tape to hold the screw in place. Wrap the rest of the tape securely around the screwdriver. Once the screw gets started, just pull loose. Don't be proud. This little trick saves a lot of dropped and lost screws. Use just enough tape to hold the screw in place. Wrap the rest of the tape securely around the screwdriver. Once the screw gets started, just pull loose.
The tape should stick to the screwdriver and not the screw. Remove the tape and then finish tightening the screw. Painfully simple.
|