June 2013
Developed a fairly classic sign of bad master cylinder (MC) and/or slave cylinder (SC) when my clutch pedal got mushy and did not come all the way back up when pushed to the floor. Check fluid level under hood in MC reservoir (takes brake fluid) and was still full. Looking under R side of car on trannsimission while GF pushed clutch no obvious leaks, slave cylinder still moving clutch fork but not as much travel as I thought it should have. Then I realized this little Z still had the original MC and SC, twenty-six year old parts, unbelievable. The parts are cheap on line so I decided to replace both the MC (under hood) and SC (under car) since I think it is fair to say I got my money's worth out of the originals. Plus, I have heard that you are supposed to always replace the MC and SC together, although I confess to not having done so in the past on other cars when one of the components was obviously leaking.
The parts were cheap on-line from Rock Auto, and I would only rather bleed the system once. I also bought an Earl's stainless steel clutch line, which was the most expensive piece of the three.
| Dorman slave cylinder | $9.64 | shipped with MC | | Dorman master cylinder | $12.86 | + $8.64 shipping | | Earl's stainless steel line | $ 26.00 | including shipping | | Grand total parts + ship | $57.14 | not including brake fluid |
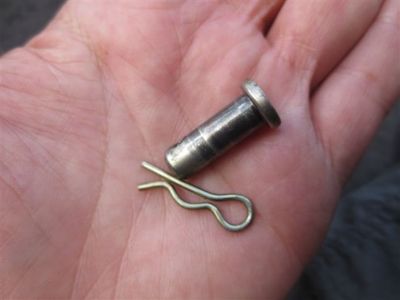
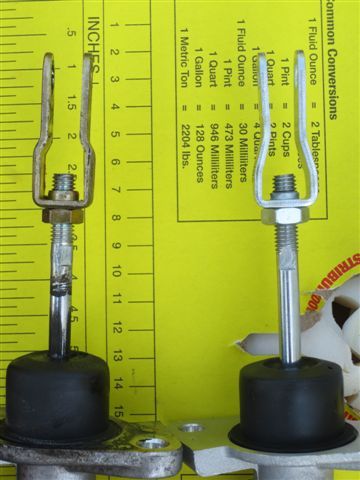
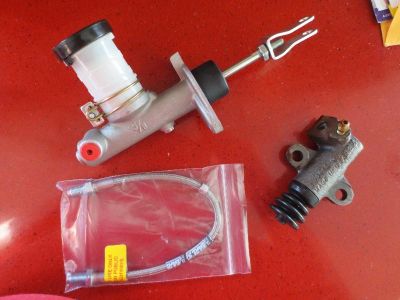 MC on top. SC to right was sent without the pushrod which should be sticking out of the rubber bellows. Reused old pushrod from original SC still on car. Earl's SS clutch line in bag, yellow tag states "For Offroad Use Only, Do Not Use On Public Roads Or Highways," LOL. MC on top. SC to right was sent without the pushrod which should be sticking out of the rubber bellows. Reused old pushrod from original SC still on car. Earl's SS clutch line in bag, yellow tag states "For Offroad Use Only, Do Not Use On Public Roads Or Highways," LOL.
Unlike on the z32, you can see from the bracket at the end of the pushrod on the new MC above and the old MC below behind the clutch pedal. The first step is to disconnect the old pushrod from behind the clutch pedal, inside the cabin of the car.
 I am lying on my back looking up under the dash at the clutch pedal. Grab cotter pin and pull with needle nose pliers and pull. Pin will spin to allow for a good angle from which to pull. I am lying on my back looking up under the dash at the clutch pedal. Grab cotter pin and pull with needle nose pliers and pull. Pin will spin to allow for a good angle from which to pull.
 This is what connects the MC pushrod to the back of the clutch pedal. This is what connects the MC pushrod to the back of the clutch pedal.
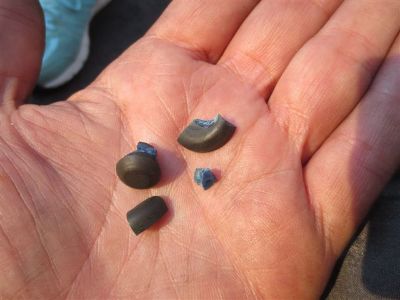 WTF? I found these bits on the floor after I disconnected the push rod from the clutch pedal. Then I remembered what happened behind my brake pedal a couple of years ago. This pieces are from a broken stopper that presses on an electrical switch when the clutch pedal is released. WTF? I found these bits on the floor after I disconnected the push rod from the clutch pedal. Then I remembered what happened behind my brake pedal a couple of years ago. This pieces are from a broken stopper that presses on an electrical switch when the clutch pedal is released.
There are two such switches behind the brake pedal, one switch turns on the brake lights and the other disengages the cruse control when the brake pedal is pressed. The switch behind the clutch pedal that mates to the crumbled stopper above also disengages the cruise control when the clutch pedal is pressed.
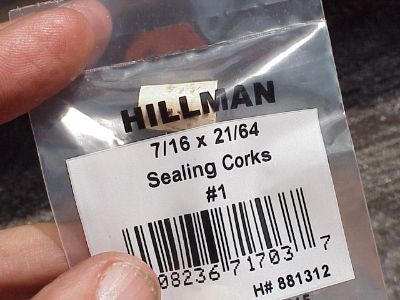 Same "part" I used when this problem appeared a couple of years ago, and that repair held up fine. I made a run to Lowes for more corks. Same "part" I used when this problem appeared a couple of years ago, and that repair held up fine. I made a run to Lowes for more corks.
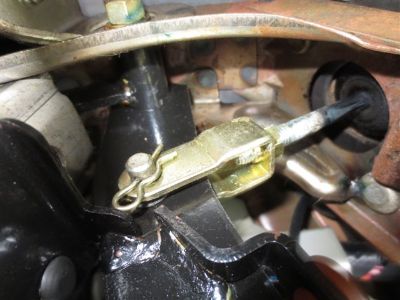
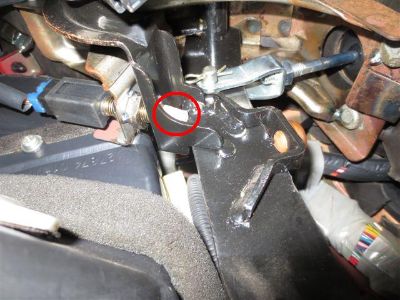 Hard to tell from these pics, but the cork perfectly filled the hole in the arm of the clutch pedal left by the crumbled stopper. The red circle is the tapered end of the cork that was pushed through the hole in the clutch pedal from the other side. Hard to tell from these pics, but the cork perfectly filled the hole in the arm of the clutch pedal left by the crumbled stopper. The red circle is the tapered end of the cork that was pushed through the hole in the clutch pedal from the other side.
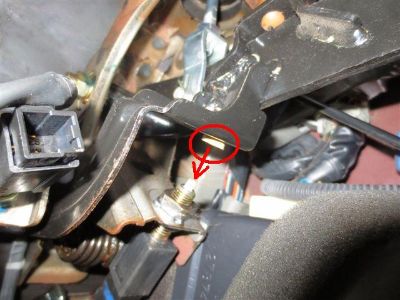 Shown is the clutch pedal depressed, the wide end of the cork is circled, and the contact it makes with the white tip on the electric switch at the arrow when the pedal is released, which disengages the cruise control. Shown is the clutch pedal depressed, the wide end of the cork is circled, and the contact it makes with the white tip on the electric switch at the arrow when the pedal is released, which disengages the cruise control.
Back to the clutch master cylinder. Lift windshield washer reservoir straight up to make room for removing the MC, no tools needed. There are a suprising number of electrical and hose connections under the reservoir but I only had to disconnect ONE electrical connector then there was enough slack in the lines to set the reservoir aside under the hood.
 This is under hood, the MC still attached to the firewall by two 17mm nuts. Rags are stuffed under MC to catch fluid. Hard line disconnected with a 10mm FLARE nut wrench. This is under hood, the MC still attached to the firewall by two 17mm nuts. Rags are stuffed under MC to catch fluid. Hard line disconnected with a 10mm FLARE nut wrench.
Get you some flare nut wrenches for working on clutch lines, brake lines. Regular wrenches can easily strip these kinds of nuts so don't find out the hard way.
I like to use a turkey baster to suck out the old fluid from the reservoir. The 26 year old fluid was black and gross. Have plenty of rags or paper towels ready as there will be drippage and brake fluid is toxic to paint and living things.
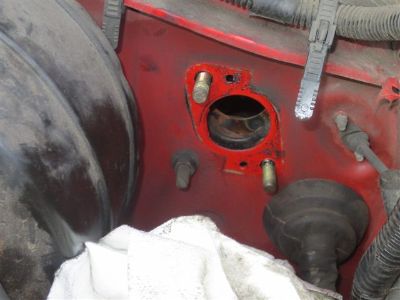 Studs on left side of firewall where MC used to be. The 17mm nut on lower stud required an extension and some care not to drop it. Studs on left side of firewall where MC used to be. The 17mm nut on lower stud required an extension and some care not to drop it.
 This little trick saved me having to adjust the clutch pedal under the dash at the end of the job. I counted the number of exposed threads on the old MC push rod and adjusted the nut on the new push rod to match. This little trick saved me having to adjust the clutch pedal under the dash at the end of the job. I counted the number of exposed threads on the old MC push rod and adjusted the nut on the new push rod to match.
Jack car and crawl underneath from R side. SC is on transmission bell, push rod moves clutch fork sticking out of transmission housing, see below pic.
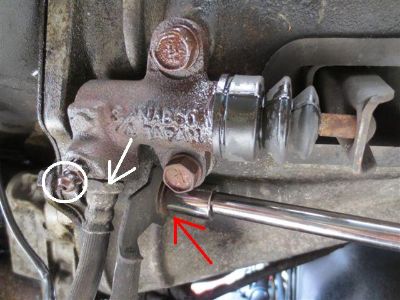 Red arrow shows a transmission bolt and grounding bracket I had to remove first before I could get a wrench on the old clutch line at the white arrow. Red arrow shows a transmission bolt and grounding bracket I had to remove first before I could get a wrench on the old clutch line at the white arrow.
Now that I think about it, I could have just removed the SC with the clutch line still attached to it, but my Haynes manual said to remove the clutch line first. That's what I get for following directions.
The two SC mounting bolts were 14mm and I needed by 3/4 wrench, plus I soaked the bolts with PB Blaster the day before or I don't think I would've gotten them loose, but I am kinda weak.
 Most new SC's come with a push rod. My Dorman SC did not so I reused this old push rod which is easy to switch over by hand, no tools neeed. The end closest to my fingers sticks out of the new slave cylinder Most new SC's come with a push rod. My Dorman SC did not so I reused this old push rod which is easy to switch over by hand, no tools neeed. The end closest to my fingers sticks out of the new slave cylinder
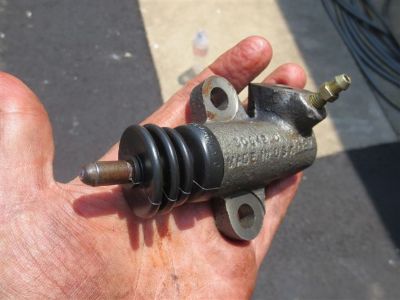 I cleaned the old push rod and pushed the correct end into the new SC. The fit is loose and the push rod jangles in place until the SC is under hydraulic pressure. The nipple or bleeder is seen right upper corner on SC and is where I bled the system when I was done with the install. I cleaned the old push rod and pushed the correct end into the new SC. The fit is loose and the push rod jangles in place until the SC is under hydraulic pressure. The nipple or bleeder is seen right upper corner on SC and is where I bled the system when I was done with the install.
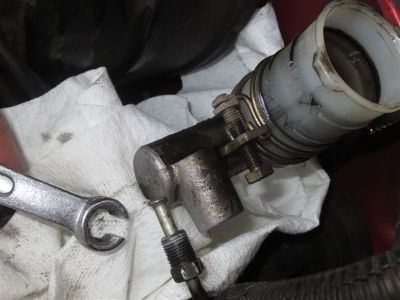
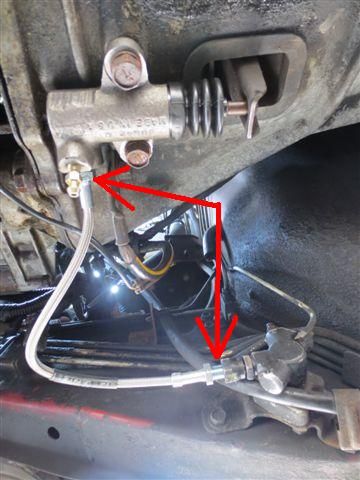
 Under car, other end of soft clutch line goes to his clutch damper. The damper has no moving parts so I did not replace it. New clutch line installed at arrow. The nuts on the end of the clutch line do NOT turn because the damper had this feeder nut at arrow which did all the turning. Under car, other end of soft clutch line goes to his clutch damper. The damper has no moving parts so I did not replace it. New clutch line installed at arrow. The nuts on the end of the clutch line do NOT turn because the damper had this feeder nut at arrow which did all the turning.
The hard clutch fluid line coming out of the right side of the damper is the same hard line that is connected to the MC under the hood, in other words the hard line is long which is why it can take eight plus ounces and 100 clutch pedal pushes to get all the air out when bleeding the system after the install. There has to be coordination and communication between the person doing the bleed under the car and the person pressing the clutch pedal. I've never had trouble bleeding brakes or clutches, but some folks seem to struggle. I think ideally bleeding is a THREE person job, one on the pedal, one on the bleeder, and one feeding the reservoir fluid so the level doesn't go too low and start sucking air which is another way of saying starting over. Yeah, I have heard of speed bleeders and I don't like them because they violate one of Robo's Rules of Z-Dom, "Do not unecessarily add to the number of moving parts."
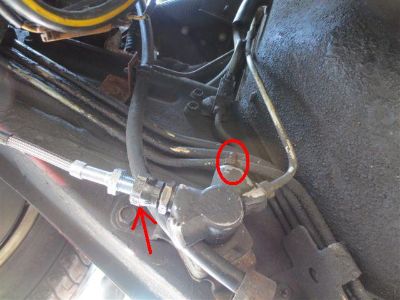
My Haynes manual said to bleed the system at the bleeder circled on top of the damper above. But I never got any fluid and maybe a little air out of this bleeder on the damper. I did 99% of the bleed from the SC.
 Front of car is to left of pic. Two ends of new stainless steel clutch line connecting the new SC and the old clutch damper. The Earl's SS line had American 9/16 nuts on the ends, while everything else was of course metric. Front of car is to left of pic. Two ends of new stainless steel clutch line connecting the new SC and the old clutch damper. The Earl's SS line had American 9/16 nuts on the ends, while everything else was of course metric.
For the bleed I hooked clear plastic tubing over the SC bleeder and put the other end in a clear bottle with about an inch of new fluid at the bottom. I have should have take an picture of the first fluid that come out of the system - it was black and gross!
There's tons of stuff on the Internet about bleeding but it basically goes like this: The clutch pedal only goes down when the bleeder is open, and the clutch pedal only goes up when the bleeder is closed. The person opening and closing the bleeder (1/4 turns) shouts commands to the person on the pedal. Don't let the reservoir run low. Once you suck air into the system from the top, that is a "start over." You need a clear hose connected to the bleeder and a see through bottle to catch the fluid so you can see bubbles. Keep the end of the hose in the bottle under the fluid. When there are no more bubbles, you are probably done.
Like most parts that go gradually bad, the change to new parts was dramatic. The firmness and feel with the new MC and SC, and fluid was fantastic. I had to adjust my left foot when driving because the clutch was so much grabbier.
|