When I later bought my '95 Twin Turbo it had this same problem as this. I tweaked a few changes for the better so take a look under my 1995 z32 section about this fix, too. The two main differences were that for above, I completely removed the tumblers from the lock housing, and I disconnected the black electric sensor from the lock. Also, I did the job above without any "precision" tools.

The key lock on my rear hatch had not worked ever since I bought my '92 Z, back in 2002. The key would insert but not turn. I removed the lock from the car, cleaned it up, oiled it, but it still didn’t work. So then I posted on TwinTurbo.net. Rob Rudeau answered with a detailed “how to” from his memory, that was very similar to what I had done except that I had not taken the lock far enough apart. What made his answer to my question even more charitable was that he did not own a Z anymore. Gotta love that kind of dedication to Z-dom.
So this write-up is in large part from his contribution, along with my pics. Rob promised me it would work and it did. As he put it, “If this doesn’t work, you either didn’t do it right, or the lock was switched out.”
Another consideration would be if there is a problem with more than one lock on the car, then consider trying a new key. Sometimes the problem is the teeth and grooves of the key are worn down.
I know of another person who used this info to retrieve a broken off key out of his lock. Thanks to my girlfriend for taking the shots of me working at her dining room table next to her kids eating pizza :c)
Tools needed
- 10mm socket and wrench
- slotted screwdriver
- Channel Locks or bench vise
- “precision” tool kit (“eyeglass” screwdrivers, small, fine nosed pliers)
- degreaser and penetrating lubricant of your choice
Difficulty: Two out of five. If you don’t like working with small parts then maybe this job is not for you. Otherwise pretty easy.
Time to complete project: 1-2 hours.
1. Remove the rear, center interior trim piece that is covering the lock assembly inside the hatch. You don’t have to mess with the “300 ZX” exterior, rear center panel that has the keyhole in it. Peel back the rear hatch carpet to expose the two 10 mm nuts holding the bottom brackets of the trim piece. Remove the two plastic thumbscrews near the top of the trim piece and carefully lift the trim piece out. The plastic brackets at the bottom of the piece are susceptible to snapping off so do not pry on them.
2. You can now see the lock. Green arrows point to the four connections. Undo the two 10mm nuts. Gently rotate and pry off the white, plastic retaining clip connected to the metal rod. Disconnect the electrical connection. Pull the lock out. Your hatch will still close and function using the release next to the driver’s seat, even with the lock removed.

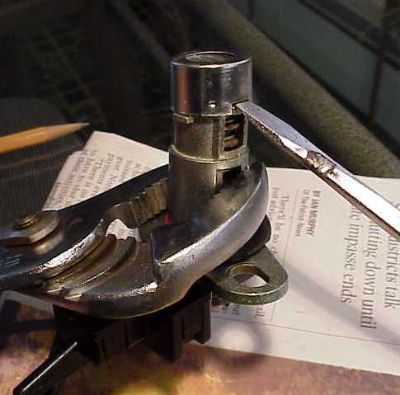
3. For this next step, I held the lock with Channel Locks in one hand (you might want to use a rag for padding) and a slotted screwdriver in the other. Carefully pry off the metal cap at the end of the lock. It is thin, and soft, so don’t damage it. It has dimples that are pressed into recesses in the lock body. Be gentle and take your time.
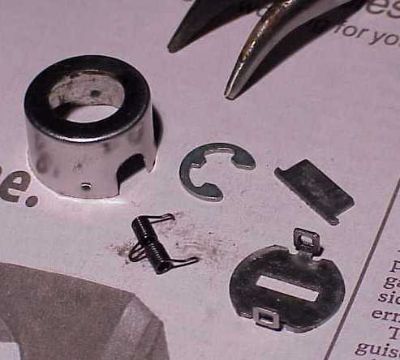
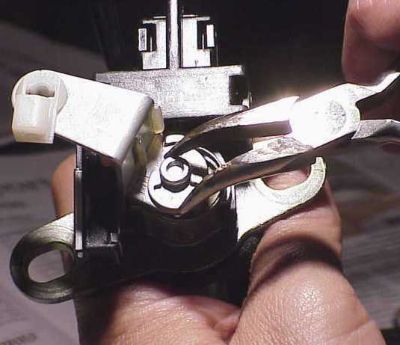
4. Once the cap is off, you will see a flat metal bracket over the end of the lock that is snapped into place on two sides. Pry this off and be ready for the two small parts underneath it to fall out. They are the small metal flap that closes the keyhole, and the spring that works it. Set these small parts aside. The pic also shows the C-clamp described below.
5. Just cleaning the lock at this stage didn’t work for me the first time. You have to take it to another step. Pry off the C-clamp on the opposite end of the lock. The bracket with the white plastic clip will then fall off. It can only go back on one way, so don’t worry too much about its orientation.
6. Now you can push on that end of the tumbler assembly such that it will slide forward inside its housing a quarter inch or so. The reason this is important is that it allows you to gain access to the first tumbler at the opposite end, closest to where the key enters, and it loosens up the tumbler assembly in general. The pic shows pressure being applied with my thumb so I can work the first tumbler at the opposite end.
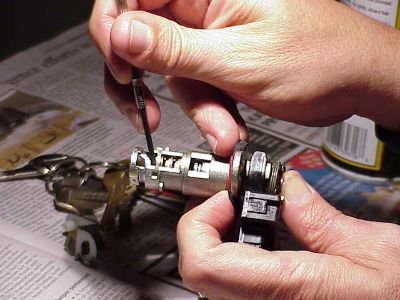
7. Soak and clean the entire mechanism with penetrating oil. I used degreaser first as my lock was pretty gummy from exhaust and road grime. The tumblers are the brass pieces. They should move when you push on them. Use a tiny screwdriver. The first tumbler seems to be a common sticking point from my experience and talking to other Z owners.
8. Now test the lock with your key. It should turn. Keep cleaning and oiling it until it does, because if it doesn’t turn now, it won’t turn when you put it back together. My lock turned on the third or fourth try. With the tumbler assembly turned, put more oil on the new, exposed parts. I finished up with a light coat of lithium grease on the tumblers, including putting some grease on the key and using it in the lock a few times.
9. Reassemble. Put the bracket with the white retainer clip in place, then the C-clamp. A small pair of curved needle nose pliers worked great for getting the C-clamp back in place.
The small parts on the keyhole end can really only go back together one way. The two arms on the spring point away from the keyhole. Hold the metal keyhole flap in place on top of the spring with one hand, and slide the retaining bracket over with the other hand.
You may want to check the retaining bracket for fit before you start this step since I found it can get slightly deformed during the removal.
10. Snap the round, metal chrome cap cover back in place. Reinstall lock and enjoy the pleasure of having made your Z work just a little bit better. My hatch now opens using my titanium, red, or black valet key, smooth as silk. :c)
|