Recently, more attention has been paid to the benefit of providing multiple ground points to an engine. There have been plenty of articles in enthusiasts' magazines that show small but significant increases in horsepower by simply adding additional ground or "earthing" wires. Here in the United States, "grounding" is the term used. Practically every other English speaking country in the world calls it "earthing."
"Import Tuner" magazine showed a three horsepower gain on a 300ZX NA using an A'PEXi ground kit. Their kit cost over $200 and used a voltage stabilizer. The materials for the kit shown here cost me less than ten dollars. Proponents also point to easier starting, smoother idle, brighter headlights, and improvements in just about anything electrical in the car. Whether or not you're a "believer," this mod is safe and inexpensive, which is more than you can say about a lot of other mods we do to our Z's.

This explanation is mostly conjecture on my part. Conventional thinking used to be that grounding was an "all or nothing" phenomenon. Either your car battery was grounded, or it wasn't. The amount of electrical current running through the negative battery terminal is equal to that running through the positive end. The battery represents part of a giant, complete circuit for everything electrical in the car, no matter how far away that component is from the battery, or more precisely, the battery ground.
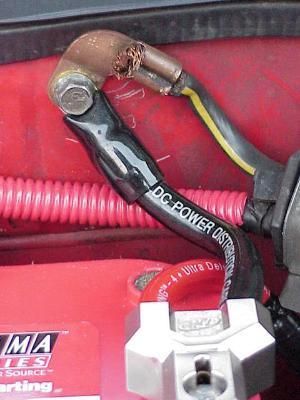
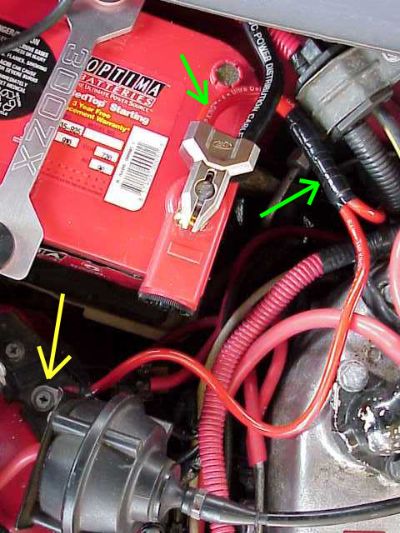
The stock, negative battery cable on my '92 TT had TWO grounding points. The first was right next to the battery where the cable was stripped bare and attached to the firewall. I modified this ground point when I put in my Optima battery with the black DC power line shown, but this is a stock ground location.
The cable then continues down and attaches to the transmission bell housing. Interestingly, a Nissan parts technician whom I respect told me that replacing the negative cable without reusing both stock grounds was a known issue for the Z not running right. So even the stock set up is apparently designed for two, and not just one battery ground. Logically, if two grounds were better than one, then more than two grounds might be better still.
The distance and thickness of the metal between the battery grounds and the various electrical components of the car vary considerably. This creates differences in resistance, which in turn creates small, undesirable variations in voltage at different points around the engine and car where electrical components are in use. This includes everything from the fuel injectors to the dash lights. The extra grounding wires improve the current flow back to the battery by lowering the resistance with multiple paths, allowing for more reliable and consistent voltage.
The way in which extra grounding points could improve horsepower is probably through cleaner data transfer to the ECU (Electronic Control Unit, or the car's central computer). The ECU controls multiple engine functions. IMHO, the single most important of these functions that could benefit from improved grounding is the timing and duration of voltage pulses to the fuel injectors. There are probably additional benefits for all the engine functions controlled by the ECU that result in more accurate performance, smoother idle and better acceleration.
That's my story for now and I'm sticking to it. Feel free to contact me through this web site if you have any constructive criticisms.
Earthing or grounding kits are hot selling aftermarket items that didn't even exist a few years ago. Nismo, the racing division of Nissan, makes one for the new 350Z. Prices of these kits can run upwards of $100 to $200. The materials for the "home made" earthing kit shown here cost less than $10, but the power cable was on sale ;c)
Tools and materials needed
- pair of wire crimpers and strippers
- metric socket set
- 5-6 feet of power cable, 4-8 gauge, or whatever gauge you like
- one 4 guage butt connector (optional)
- bunch (dozen) of round cable terminal ends
- shrink wrap
- lighter / heat source
Difficulty: 1.5 out of five, or pretty dang easy. I like to call this "the best Z mod for under ten bucks."
Time: about an hour and a half
The goal is to install a series of continuous connections in the engine bay, from fender to fender, using the negative battery terminal as one link in the chain.
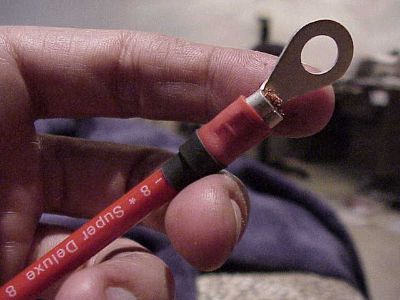
I went to a local electronics supermarket, and bought "Super Deluxe 8 gauge DC Power Distribution Cable." You could use four gauge, or even two gauge, which is heftier, but I would not go any smaller than eight gauge. I bought red cable to match my car and silicone hoses, but if I had to do it over I would probably choose black, which is the usual color for a ground wire.
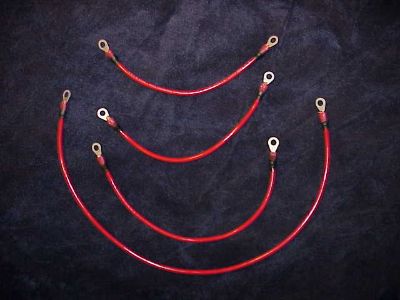
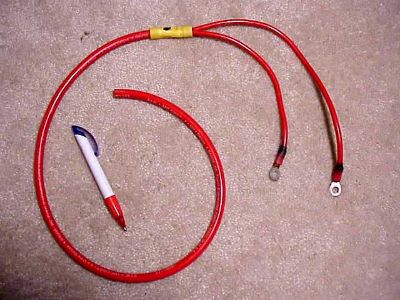
The first two photos show my completed earthing "kit" which is simply four power cables cut to length, with the connectors crimped onto the ends and sealed in shrink wrap. The shrink wrap is sold as little black rubber tubes and is the black band at the base of the connection. The shrink wrap cuts to length with scissors. I like the finished look and extra water proofing it gave. I just used a Bic lighter to shrink fit it.
I simply "eyeballed" the lengths by holding the cable up to the connection points I chose under the hood, and then cut the cable on the spot, without using a measuring tape. I do not provide measurements for that reason. The connection points are not fixed, and can vary according to the year of the car, mods under the hood, or if the engine is a turbo or NA.
These connections are in SERIES, i.e. where one cable ends, another one starts, "daisy-chain" style. My connection points are just suggestions. You can use any available grounding points, meaning any solid hunk of metal on the chassis, body, or engine. There are lots of different ways you can hook up a grounding kit. Some prefabricated kits have one end of each cable connected directly to the battery. So the negative battery terminal becomes a central hub, with all the cables coming off of it like legs on an octopus.
I chose to connect the cables in series for reasons I will not completely go into here, other than saying my research supports it. I mimicked the Hyper Ground System made by Sun Automobile of Japan, since they had a fair amount of dyno testing to back up their claims. Another nice thing about using a series style of connections is a "cleaner" look since there are not as many cables sprouting off your negative battery terminal. With my set up, the earthing kit only uses one connection at the battery. Another endorsement came from one of the best Z mechanics I know, who took one look at my earthing connections and said, "That is the way it is supposed to be done." Still, this is the most often argued point against me from peeps who agree with the idea of an earthing kit, but choose to connect theirs in parallel or "octopus" style.

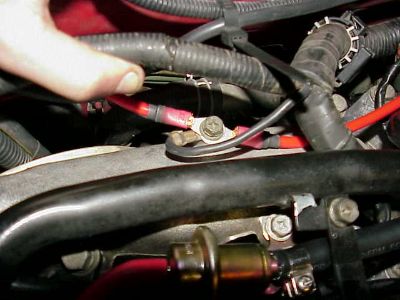
The first and shortest cable starts from the driver's side fender well. Use either one of the two bolts that holds the fuel filter bracket onto the car, shown by the green arrow in the right, lower corner. The other end of this cable goes to the second connection at a nearby plenum bracket bolt that is holding, among other things, a guide for the throttle cable. You can see this connection by the green arrow in the upper, left corner, and the yellow oil dipstick for orientation. The second earthing cable starts at this same bolt, and passes under the fuel lines toward the rear of the plenum. If you're really observant, you can see a bare vacuum nipple in the upper right corner. I temporarily removed a vacuum line just for the picture.
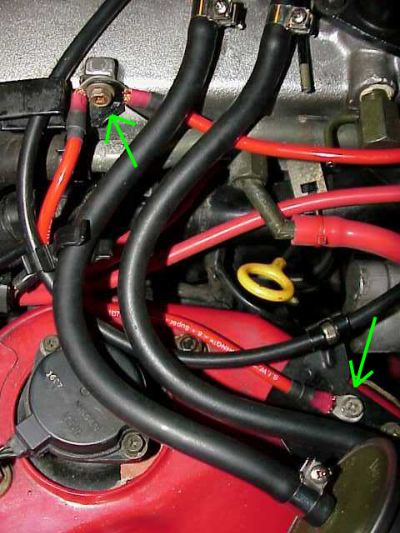 One good thing about this particular connection at the plenum is that the bolt is also connected to a bracket that goes down to the engine block, which makes it a better ground. One good thing about this particular connection at the plenum is that the bolt is also connected to a bracket that goes down to the engine block, which makes it a better ground.
The distance to the third connection is the longest of the four cables. Direct the cable toward the firewall, then a 90 degree turn to the left along the back of the plenum, parallel to the firewall. There is a bolt on the top, rear of the plenum, nearer the passenger side as shown in the picture. This bolt was already being used as a ground for a connection coming out of the main harness, and for nothing else, as far as I could tell. You are about 2/3 the distance to the battery at this bolt. The photo also shows the rear of the plenum, the balance tube, and the fuel damper in the lower middle part of the photo to orient you. The driver's side is toward the right.
 The second red cable from the previous picture is entering from the right side of the pic. The third cable can be seen exiting toward the left, under my thumb, toward the battery. The second red cable from the previous picture is entering from the right side of the pic. The third cable can be seen exiting toward the left, under my thumb, toward the battery.
I decided to combine the third and fourth cables into one thicker, four gauge cable, simply for the sake of a cleaner connection at the negative battery terminal.
 The yellow piece is a four gauge butt connector. There is a lot of extra length shown on the thicker, four gauge cable, that I cut off before connecting it to the negative battery terminal. The yellow piece is a four gauge butt connector. There is a lot of extra length shown on the thicker, four gauge cable, that I cut off before connecting it to the negative battery terminal.
Here is that connection at the negative battery terminal. The green arrows point to the earthing ground in red, and the yellow butt connector is now covered with black electrical tape. The final earthing connection can be seen by the yellow arrow.
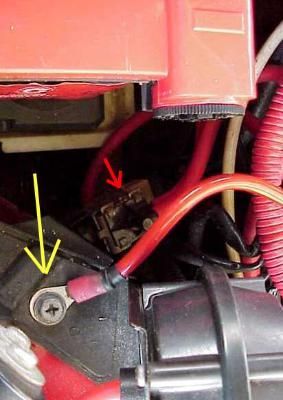 Here is a close-up of the final earthing connection again shown by the yellow arrow. The bolt secures a bracket attached to the cruise control module seen in the lower, right corner, and the AIV and EGR solenoids. The negative side of the battery is in the top of the picture. My AIV solenoid was removed but the red arrow points to the EGR soleniod. There is a red vacuum hose connected to the EGR solenoid, not to be confused with a grounding wire. Here is a close-up of the final earthing connection again shown by the yellow arrow. The bolt secures a bracket attached to the cruise control module seen in the lower, right corner, and the AIV and EGR solenoids. The negative side of the battery is in the top of the picture. My AIV solenoid was removed but the red arrow points to the EGR soleniod. There is a red vacuum hose connected to the EGR solenoid, not to be confused with a grounding wire.
Easy as pie. Don't overtighten any bolts into the plenum, which is soft aluminum. After I connected the earthing grounds at the battery, the car idled smoother, which I took to be a good thang. I think the car also ran smoother, started easier, and I swear my stereo sounded better, but that could just be my mind playing tricks on me.
Along with the preexisting stock battery grounds, this mod yielded a total of six ground points. How many grounds are too many? Reportedly, the point of diminishing returns after which you would not notice any measurable improvements is ten.
|