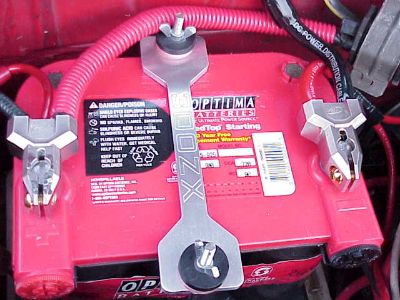
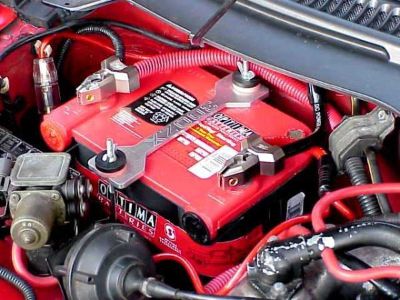
I first installed this Optima Red Top while in the parking lot of the auto parts store where I bought the battery. Even though this "Advanced" store advertised "free battery installation," the sales guy took one look under the hood of my Z and said, "No way am I gonna touch that!" I wasn't happy with my installation efforts either, but in the interest of leaving the parking lot under my own power, I settled for this.
 The two, extra red cables off of the negative terminal on the right are part of my old earthing kit. The two, extra red cables off of the negative terminal on the right are part of my old earthing kit.
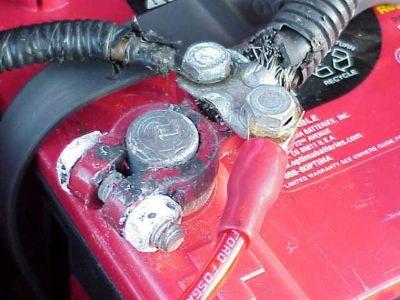 The red cable off of the positive terminal is the power supply to my stereo. The red cable off of the positive terminal is the power supply to my stereo.
The cable ends were chewed up and the quality of the connections was poor. The negative ground wire was too short and pulled too tight. The battery terminal ends were cheap, Sears brand, corroded, and too close to the hood when closed. The stock tie down bar was chintzy and ugly.
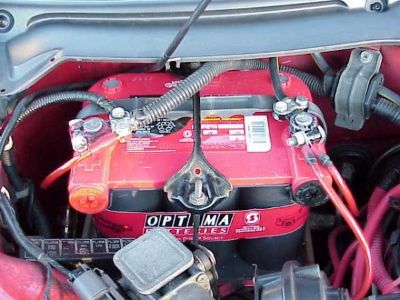
 Here is the "after" pic for comparison. Big improvement, don't you agree? Here is the "after" pic for comparison. Big improvement, don't you agree?
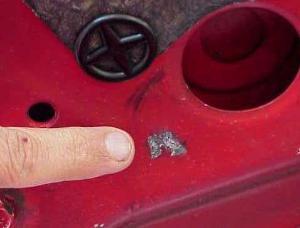
You have to remove the smaller, passenger side windshield cowling in order to remove the stock battery. The cowling is held in place by four plastic fasteners, two round ones and two square ones. You gently back the screws out and pry the clips up.
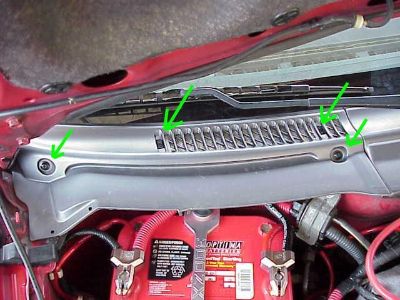 Another good feature about the Optima is that it is smaller than the stock battery, and you can remove the Optima while leaving the cowling in place. Another good feature about the Optima is that it is smaller than the stock battery, and you can remove the Optima while leaving the cowling in place.
I installed new cowling in the past so I bought a dozen extra fasteners at the time, which basically amounted to a lifetime supply. That way, I don't have to worry about damaging them when I am doing jobs such as this, since the fasteners are fairly delicate. Here are the part numbers.
cowl fasteners (round)
also called
"clip canoes" | cowl rivets
(square) | | 66860-01W01 | 66814-01A00 |
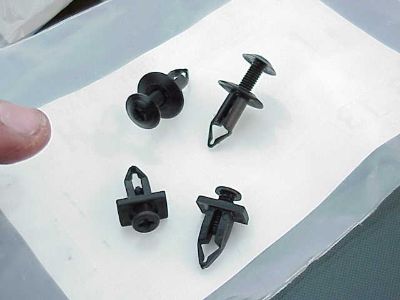 These cost about a buck each. These cost about a buck each.
I bought two Phoenix Gold battery terminal ends from a local stereo shop. Last time I checked they were getting pretty hard to find anywhere. The model numbers are XSBX205 for the postive terminal, and XSBX215 for the negative terminal. Try Google, don't E-mail me.
I had to make the negative battery cable longer from where it was attached and grounded behind the battery at the firewall. I cut off and removed the piece of the old negative ground at the bracket as shown. Then I made a new "extension" out of some black, two gauge power cable with a gold ring connector on one end and ran this from the bracket mounting bolt back to the negative battery terminal end.
 I left the rest of the original ground wire in place, which was still attached to the firewall by the same bracket. This cable is also grounded at the tranny bell housing. Props to down5hift from TT.net for suggesting this set up to me. I left the rest of the original ground wire in place, which was still attached to the firewall by the same bracket. This cable is also grounded at the tranny bell housing. Props to down5hift from TT.net for suggesting this set up to me.
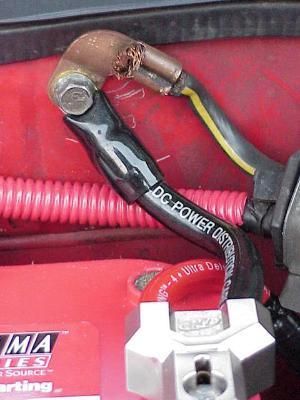
 The battery came with this red, plastic cover that was designed to be flipped over and used as a tray under the battery. The battery came with this red, plastic cover that was designed to be flipped over and used as a tray under the battery.
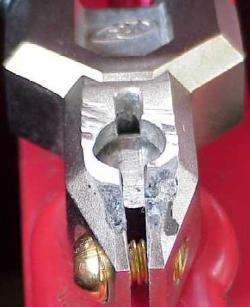
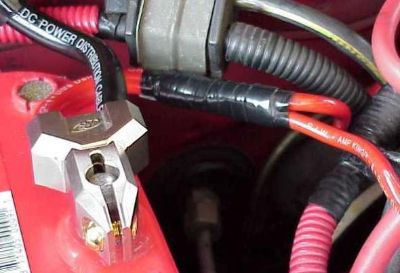
The battery may sit too high on top of this tray. I had clearance "issues" with the positive battery cable terminal hitting the underside of the hood. Read as - sparks, car shutting down, fire hazard, metal arc-welding itself, NOT GOOD! Here is a close-up of the positive terminal end AFTER I cleaned it up and filed it open from welding itself shut solid across the gap at the tips. You can even make out the shape of the terminal tip at the contact point under the hood. ZZAAAPP!
I have heard from others that they used the tray under their Optimas without any issues. The Optima Red Tops come in different sizes, so a shorter battery can be used with the tray and the stock tie-down rods. The battery post can also be filed down for extra clearance, if necessary.
 At the negative terminal, I combined my two, red eight gauge, earthing cables into one, four gauge cable, using a butt connector. At the negative terminal, I combined my two, red eight gauge, earthing cables into one, four gauge cable, using a butt connector.
The silver butt connector is under the black electrical tape. I crimped it with a large awl and a small sledge hammer.
I cut all the ring connectors off the ends of any old cables attached directly to the battery and reconnected the raw ends directly to the new terminal ends. Each terminal accepts two 1/0 gauge, and one 8 gauge cables, for a total of three cables per terminal.
I bought a new tie-down strap (no longer available) in brushed metal finish which happened to match the Phoenix cable ends. I had to buy new tie-down rods and cut them to length. The front rod is longer than the back rod because of the shape of the battery tray. I used wingnuts instead of flange nuts to attach the strap to the rods. I removed the gray, plastic handle from the battery.
Here is the final install again with the cowling in place. Looks great in my red car with the red vacuum hoses and red loom.
The Optimas are sealed, and maintenance free, and have come down in price in the past couple of years. I paid $116 for mine, with a three year full replacement / seven year pro-rated refund warranty.

The Optima Red Top is the model of choice for most Z owners, according to my research and E-mail correspondence with Optima tech support.
The Red Top is designed to be used as a starting battery in a passenger vehicle with little or no aftermarket accessories (less than 400 watts). If you keep in mind the Yellow Top was designed for fishing trolling motors, electric wheelchairs, golf carts, RV power sources, and 4X4's winches, then you kinda get the idea.
The two main reasons a Z owner would want to consider a Yellow Top are 1) "high powered" stereos over 400W, and 2) aftermarket alarms left on when your car is stored for a long period, as in the winter.
According to Optima, if you use a Red Top for aftermarket accessories greater than 400W, this voids the warranty. How Optima would know what you have hooked up to your car is a separate issue that I won't go into.
The Yellow Top is designed to be drained 60-70% and then recharged or cycled regularly. That is what is meant by "deep cycle;" more reserve power. The Red Top has more "peak" power but will drain faster.
The typical drain on a battery for starting, lighting, and ignition (SLI) and with "light" accessory use is 1-3%. If a Red Top is drained too deeply, too often, the battery life will be shortened proportionally to how often this cycle occurs.
You will not hurt your car or the battery if you use the Yellow Top for SLI but this is overkill, like using a shotgun to kill a spider. Plus, the Yellow Top costs significantly more and only carries a one year warranty compared to the Red Top's three year full replacement / seven year pro-rated warranty. And damn, the Red Top looks so much better in my red Z ;c)
Read the FAQ on www.optimabatteries.com if you have more questions.
Hope this helps :c)
|